Well it has been a good bit of time. A lot has happened in life, as it usually does.
First off, we have moved from Columbia, SC back home to Georgia. We found a great place in Newnan, GA and we are starting to finally get comfortable with our situation, our home, and where things are. This means that I am getting away from having to get weekend projects out of the way to make the house livable and back to working on my hobby, what this blog is all about, my ugly VeDub.
I am proud to say that we also found out that we are going to be parents for the second time. We figured the first one was SO easy we might as well do this again….. OK, sarcasm does not really translate very well in text.
I will get some photos updated here in the coming days now that my beetle has found its way to a new home, a new garage and a new spot to get restored.
Thanks for hanging in there with me and thanks to all the folks that have been hounding me for new pictures, an update, or anything for that matter. I will be sure to get you new pictures in the coming days.
Wednesday, July 7, 2010

Thursday, August 14, 2008
Some before and after shots
So I was looking over some of the pictures that I have taken.... it is hard to believe that I have had this car for about a year now. Only ten more before it is road worthy :)
August 2007

September 2007

October 2007

July 2008

August 2008

I have been toying with this quarter panel the last few days, still getting some gunk out from the wheel well. There is that pin hole that filled with some body filler, it still needs to be sanded down. It shouldn't be long before I get the whole quarter panel primed.
Friday, August 8, 2008
The rear quarter panel - drivers side
I have spent some time putting a wire brush to the drivers side rear quarter panel. I know I mentioned this before but, it is worth saying again... 35 years of dirt, grime and everything a car picks up year after year doesn't just wipe off with a Kleenex. You have to hack and chop at it, drench it cleaner, work at some more and then when you are at your wits end you beg and plea with the gunk... in the end, it all comes off.
So here is a before shot....
here is an after with some primmer... This is by no stretch done, I threw a layer of rattle can primmer on the quarter panel to prevent surface dust that started to pop up since I brought the car down to bare metal. The plan is not to put any primmer down unless I am completely satisfied with the surface metal and the condition of the body work.... below is a good example of what I am talking about.
This is a shot of the inside of the wheel well. There was a lot of, for lack of a better word, gunk layered on this metal. I worked it over and over in order to get it down to what you can see below...
So here is a before shot....
here is an after with some primmer...
 This is by no stretch done, I threw a layer of rattle can primmer on the quarter panel to prevent surface dust that started to pop up since I brought the car down to bare metal. The plan is not to put any primmer down unless I am completely satisfied with the surface metal and the condition of the body work.... below is a good example of what I am talking about.
This is a shot of the inside of the wheel well. There was a lot of, for lack of a better word, gunk layered on this metal. I worked it over and over in order to get it down to what you can see below...
 If you look closer into the wheel well, you can see just how thick it is.
 Well back to my point about the bare metal and trying to explain my satisfaction before applying primmer... I am going to have to pull the wheel off, remove the rear shock and who knows what else before I can get into all those crevasses and get it to a spot that is ready for primmer.

To further explain how obsessive I can be about things... check out some of the other work I need to get done on the rear quarter.
I had this spot down at the bottom of the quarter panel. There was a dime sized rust hole on the right just to left a pin hole. I did grind down all of the rust and got it to nice and shinny metal. I put in some body filler (it took me two attempts to figure out how much to mix and how fast it dries)
Here is the after picture when I was able to sand down all of the excess... You can make out the pin hole on the left... I need to get that taken care of, I need to get the rest of that rust off the bottom of the body and it is good and ready for some primmer.....
 So there it is... I may have not spent hours and hours on end but it has been a little here and a little there.
Below are some more pics that I don't feel like setting up, take a look.
Let me know if you want to see more or less of anything in particular. 

Monday, August 4, 2008
It has been a while!
Hello all!
I know I have not updated this site in about six months. What can I say, life has been a bit crazy in the last few months. Updating my blog has not been the highest priority for me nor has been hammering on the beetle with any kind of dedication.
The bug... I have not been able to spend hours on end or anything like that but I have been toying with the car when I get a few minutes. Ten minutes here or twenty minutes there... all of this equals not too much of a noticeable gain but, it is not wasted time. I have been able to get some of the more detailed paint remove taken care of. In between the slots above the rear deck have consumed the most time but they are all done and ready for primmer. There are a few other spots that got some attention over the months...again, nothing with with any kind of dedication but a little work here and there.
I will be sure to get a few pictures taken and updated here in the next few days.
At any rate, thanks for checking back in. I am still working on it and it is still a pretty good hobby as far as hobbies go!
I know I have not updated this site in about six months. What can I say, life has been a bit crazy in the last few months. Updating my blog has not been the highest priority for me nor has been hammering on the beetle with any kind of dedication.
First off.... My wife and I are expecting our first child! We are both very excited!
The news of our new family member has had me running around trying to figure out what needs to be done to the house, how to arrange things in order to accommodate another person has been tough but doable. All those years of playing Tetris have finally paid off :)
My indoor swimming pool has finally been dried up and all of the flooring problems have been taken care of. The hall way came out fine and it actually looks like I knew what I was doing. I will take a couple of pictures and post to the site.... just so everyone knows I have not been slacking for the last few months.
The bug... I have not been able to spend hours on end or anything like that but I have been toying with the car when I get a few minutes. Ten minutes here or twenty minutes there... all of this equals not too much of a noticeable gain but, it is not wasted time. I have been able to get some of the more detailed paint remove taken care of. In between the slots above the rear deck have consumed the most time but they are all done and ready for primmer. There are a few other spots that got some attention over the months...again, nothing with with any kind of dedication but a little work here and there.
I will be sure to get a few pictures taken and updated here in the next few days.
At any rate, thanks for checking back in. I am still working on it and it is still a pretty good hobby as far as hobbies go!
Monday, February 11, 2008
The Master is done, now to the hallway
So I got the Master Bedroom completed on Sunday morning. I got the bulk of everything done on Saturday except for the last foot or so at the other end of the room. I did not have it in me to finish off that night so I waited till the morning.
Below is the end that of the Master the leads out to the back patio.
 Below is the end of the Master that leads out to the hallway. In case you are wondering.... yes, I had to keep the TV in the bedroom so there would be some kind of noise in the room to pass the time.
 Now that I have the Master Bedroom taken care of, I am working on the hallway. The hallway has a 90 degree bend in it that leads to the living room, kitchen and the rest of the house. I have been thinking about how I was going to make the bend, I thought that I would do 45 degree cuts and join the two ends together but after thinking about it for some time.... I decided that I am going to work a herringbone pattern. I laid a couple of boards down to see what it would look like and I think I like it. Personally this will work better for me than the 45 degree joints.
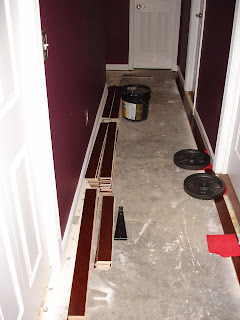
 I have the first plank laid down on the right side of the picture below. I am using some free weights to make sure the adhesive, the plank and the slab all get pressed together. So far, this has been working pretty good for me.
 Below is the where the master bedroom and the hallway come together. There is a finishing piece that I have waiting once I get the hallway done. I will post another picture once I have the hall finished.
 Well, that is it for now. I need to get the hall finished and move onto the office, living room and the entry way. More to come so check back again soon.
Below is the end that of the Master the leads out to the back patio.
 Below is the end of the Master that leads out to the hallway. In case you are wondering.... yes, I had to keep the TV in the bedroom so there would be some kind of noise in the room to pass the time.
 Now that I have the Master Bedroom taken care of, I am working on the hallway. The hallway has a 90 degree bend in it that leads to the living room, kitchen and the rest of the house. I have been thinking about how I was going to make the bend, I thought that I would do 45 degree cuts and join the two ends together but after thinking about it for some time.... I decided that I am going to work a herringbone pattern. I laid a couple of boards down to see what it would look like and I think I like it. Personally this will work better for me than the 45 degree joints.
 I have the first plank laid down on the right side of the picture below. I am using some free weights to make sure the adhesive, the plank and the slab all get pressed together. So far, this has been working pretty good for me.
 Below is the where the master bedroom and the hallway come together. There is a finishing piece that I have waiting once I get the hallway done. I will post another picture once I have the hall finished.
 Well, that is it for now. I need to get the hall finished and move onto the office, living room and the entry way. More to come so check back again soon.
Tuesday, February 5, 2008
The flooring is coming along at a good clip....
I got the laundry room back together.
I have never laid title before so I was surprised how well it turned out. I still need to get some shelving back into the laundry room but, that can wait until I get the rest of the house taken care of. I did replace the rubber hoses for both the hot and cold water after reading a good bit about how they usually fail to hold up after about five years of usage... which is pretty close to the time that I had put these in originally. Anyway, I have stainless braided lines that look pretty cool and are supposed to be guaranteed to never fail. I also replaced the old dryer vent with a pretty heavy duty version.... might as well, while I was in there anyway.


 So with the laundry room out of the way, I started on the Master Bedroom and the hardwoods. Like everything it is slow to get me started where I feel that I am doing the right thing but, I got pretty comfortable laying these pieces in and they are turning out to my liking. I think it is going to crank out in the next week or so... hopefully I can get the house knocked out by the end of the month.
Once done, I am going to take a weekend for myself and lay low.
 Well, there we are.... I need to take care of the immediate need before I can get back to the bug. I guess that is life!
I have never laid title before so I was surprised how well it turned out. I still need to get some shelving back into the laundry room but, that can wait until I get the rest of the house taken care of. I did replace the rubber hoses for both the hot and cold water after reading a good bit about how they usually fail to hold up after about five years of usage... which is pretty close to the time that I had put these in originally. Anyway, I have stainless braided lines that look pretty cool and are supposed to be guaranteed to never fail. I also replaced the old dryer vent with a pretty heavy duty version.... might as well, while I was in there anyway.


 So with the laundry room out of the way, I started on the Master Bedroom and the hardwoods. Like everything it is slow to get me started where I feel that I am doing the right thing but, I got pretty comfortable laying these pieces in and they are turning out to my liking. I think it is going to crank out in the next week or so... hopefully I can get the house knocked out by the end of the month.
Once done, I am going to take a weekend for myself and lay low.
Well, there we are.... I need to take care of the immediate need before I can get back to the bug. I guess that is life!
Sunday, January 20, 2008
serious sidetrack
It is going to be a bit before I can get back working on the VW. The washer machine overflowed and our hall way, master bedroom, and one of the spare bedrooms had a significant amount of water standing when I got home after work on Thursday afternoon. After getting a lot of the water off the of the carpet with the help of a heavy duty shop vac, it was evident that we were still going to have problems with the carpet. My wife and I took a bunch of measurements on Friday evening and figured that it would be best that we go ahead and do new flooring through the house. This is not something that either of us had planned on doing any time soon but if I am going to have the inconvenience of replacing flooring in part of the house, we might as well get the rest of the house taken care of as well.
For the time being this site is going from my-ugly-vedub to my-new-floor. Kind of off topic but I just want everyone to know that I am not slacking on the car, something bigger has come up and I need to dedicate all my time to getting this done.


For the time being this site is going from my-ugly-vedub to my-new-floor. Kind of off topic but I just want everyone to know that I am not slacking on the car, something bigger has come up and I need to dedicate all my time to getting this done.


Saturday, December 22, 2007
It is the holiday season!
Well Thanksgiving has come and gone, Christmas is almost upon us and the New Year is right around the corner.
It is hard to get anything done during this time of the year. Ten to fifteen minutes at a shot is hard to get anything done. I will resume next year when there are no commitments to the holidays. Sorry for keeping you waiting.
I hope everyone has a very Merry Christmas and a very Happy New Year! Enjoy the time with your friends and family!!!!
Sunday, November 11, 2007
I almost went to India....
You are probably asking yourself what that has to do with restoring a VW? Well, nothing really... but, I had to work most of last weekend to get myself ready to go on short notice. All to find out that some of the vaccines needed to be in my system for 4-6 weeks before they were effective.
Here is what happened. My boss asked me Friday morning if I had a passport and if I would be willing to go to India if he could not get "the other guy" to go. "Yeah sure, I will go if there is no one else to go". Friday afternoon, "pack your bags, your leaving next week". So my weekend was spent getting the work visas, a letter of invitation and all of the little things I needed (Pepto, hand sanitizer, Altoids, etc...) to make this trip possible. So I as I go for the vaccines the following Monday I was told these things need to be in my system for 4-6 weeks before they are affective. Long story short, they need someone to go next week and I can not go for at least four more weeks. Lots of work, lots of preparation for a trip that did not happen. Thus, no work done to the VW.
Here is a little work that I have been doing to the deck lid light housing. It is in bad shape, like the rest of the car, but it is small and I should be able to get it pieced together little bit by little bit.
Sunday, October 21, 2007
I got a good bit more done to the body
I have been able to spend a little bit of time with the bug through the week. Part of the reason, Baseball season is coming to an end and who really cares about the Red Sox? It also helps that it is still in the 90's around here and the garage is not getting cold at night.
I want to start off with a few pictures around the front windshield. This is the area that I am going to concentrate on this week. I pulled the wiper motor out of the car so I have a little extra room to move around.... also, it needed to come out at some point anyway. It is coming along fairly nice right now but there are a bunch of little spot that need some extra attention before I put the wire brush to it. 

 I have been putting a lot of attention to some of the areas you have already seen... It has been taking a lot of time and a lot of patience but, it has been paying off. There is 35 years of gunk on the body of this car and I guess I was expecting this to move a bit quicker but what can I do? I told myself early on that I would take my friends advise and take my time with this project. I want this car to be show quality when I am done.
You can also see that I got the garage floor cleaned up, there was a ton of paint scraped off and laying all over the place. Surprisingly, the paint gets crunchy after it lays out for a couple of days and you happen to step on it..... Just in case you wanted to know. 


 One area that I know is going to take a lot of time is the front passenger side fender. When I was stripping the paint off of that fender, there was a lot of body filler coming off with the paint. It looks like most of the front fender was covered with body filler.
I guess the car hit something (or was hit) in the front passenger side because there is a ton of wrinkling in the fender well, there is some on the drivers side but the passenger side is sever. Also, there are a few rust spots that I know are going to be stubborn in getting fixed. You can see below that they are pretty ugly. 


 That's all for this week.

Another little rust spot is on the rear passenger quarter panel. It is pretty small and I should not have any problems filling it.  I was really happy to find out that I don't need to buy a new rear deck lid. After it was removed and I had a little bit of time to look at it, I was surprised that it was perfectly straight and just needs to be worked over like the rest of the car. I don't have a picture but the other pieces, that houses the tag light, but they are in the process of being stripped and readied for primer just as the deck lid. Maybe I can have a completed, and primer-ed picture up next week. Maybe?
 The interior...
There is nothing that I can say that would be positive about the interior at this time. Besides not being a functioning space, it is wrecked and it is in the worst possible shape an interior can be in.
Once I get the body work taken care of, I was planning on moving to the inside of the car. I am going to strip it all down why the body is still on the frame (remember, I have to take care of those floor pans so the body is going to have to come off). I don't plan on stripping all of the paint out of the interior since most of it is going to be covered with
That's all for this week. I hope Colorado is able to sweep Boston thus, doing something that has never been done before (plus Boston losses so, it is a win-win in my eyes)
Monday, October 1, 2007
More body work....
What can I say? I have been spending a lot of time getting the paint stripped off of the VW, it has been very time consuming and not very exciting to read, or write, about. Just so I know that I am not short chainging anyone, and if you are truly interested, this is how it has been going....
Spray/brush on chemical stripper, wait 20 minutes or until the paint is visably blistering, scrape, scrape, scrape, drink some water, scrape, scrape..... Repeat. This took up about 5 hours on Saturday.
Now that I have that little bit of detail out of the way, we can talk a little about what has happened in the background over the past week.
I have ordered a new front apron and a new spare wheel trough. They are both heavy duty and look great compared to what is on the car now. One thing that really irritated me... Do you see that major scratch and dent on the bottom righ of the front apron? This piece came to me with no packing material in a box that was twice the size it needed to be. I am going to have to ship it back, I don’t know what all this is going to entail just yet but I am really hoping that I am not going to have to pay for return shipping.
I also got a couple of finishing pieces but I am not going to talk about them until I get close to putting them in place, you are going to have to come back to find out what they are…


 I have a number of sections that are starting to look really good compared to what it looked like before.
The rear driver’s quarter panel is just about done, there is a small rust through spot that I am going to fill in and a couple of rust blisters that still need to be taken care of.

 The rear end is starting to look pretty decent. I noticed that the rear apron is not completely straight (there is a enough of a bow around the exhaust pipe for me to notice after staring at it long enough) I am going to have to replace it just like the one on the front. The rear windshield section is pretty decent looking but still needs a lot of attention on the details.

 The passenger side rear quarter panel is coming around really nice but there is still plenty of work to be done. Take a look at all of that paint on the garage floor, what a mess! Also, I took a picture without a flash the first time around and a second with the flash. In the non-flash picture you can see the decent size dent right below the window line.

 I think I am going to concentrate on getting the paint off of the doors but once all the paint is off, I am going to move to the front end. There are plenty of rust spots along the bottom of the door and around the windows that I need to figure out what I am going to do with. I am going to have to read some more before I know what to do and how to permenantly fix this problem.


Spray/brush on chemical stripper, wait 20 minutes or until the paint is visably blistering, scrape, scrape, scrape, drink some water, scrape, scrape..... Repeat. This took up about 5 hours on Saturday.
Now that I have that little bit of detail out of the way, we can talk a little about what has happened in the background over the past week.
I have ordered a new front apron and a new spare wheel trough. They are both heavy duty and look great compared to what is on the car now. One thing that really irritated me... Do you see that major scratch and dent on the bottom righ of the front apron? This piece came to me with no packing material in a box that was twice the size it needed to be. I am going to have to ship it back, I don’t know what all this is going to entail just yet but I am really hoping that I am not going to have to pay for return shipping.
I also got a couple of finishing pieces but I am not going to talk about them until I get close to putting them in place, you are going to have to come back to find out what they are…
I have a number of sections that are starting to look really good compared to what it looked like before.The rear driver’s quarter panel is just about done, there is a small rust through spot that I am going to fill in and a couple of rust blisters that still need to be taken care of.
The rear end is starting to look pretty decent. I noticed that the rear apron is not completely straight (there is a enough of a bow around the exhaust pipe for me to notice after staring at it long enough) I am going to have to replace it just like the one on the front. The rear windshield section is pretty decent looking but still needs a lot of attention on the details.The passenger side rear quarter panel is coming around really nice but there is still plenty of work to be done. Take a look at all of that paint on the garage floor, what a mess! Also, I took a picture without a flash the first time around and a second with the flash. In the non-flash picture you can see the decent size dent right below the window line. I think I am going to concentrate on getting the paint off of the doors but once all the paint is off, I am going to move to the front end. There are plenty of rust spots along the bottom of the door and around the windows that I need to figure out what I am going to do with. I am going to have to read some more before I know what to do and how to permenantly fix this problem.
Subscribe to:
Posts (Atom)