I was just kind of toying with the body and the paint for a couple of days and a friend of mine suggested that I go to the parts store and find a chemical stripper. Going off of this suggestion, I made my way to the auto parts store on Saturday morning. The clerk recommended a particular brand that he said would strip the car "to the bone"... what a sales pitch!
I started with the rear driver's quarter panel and I was amazed by how effective this stuff was. I had to use a couple of applications to get through the coats of spray paint and then the factory paint.
There is not a lot of rust on the body and I am very happy with this!!! I thought that there was going to be a number of spots but it was just bubbled up spray paint. Also, I was very happy to discover that the body has not taken much damage over the years. There are a couple of dings, about the size of a dime, on the drivers door that I am going smooth out with body filler before I put on a coat of primer.

 The above shows a nice and smooth quarter panel. There is some paint remaining but, that is because ran out of paint stripper in the later part of the afternoon and did not feel like heading to the auto parts store again. I will pick up some more this week and resume over the weekend (the wife is going out of town so I am flying solo, much work can be done).
The roof of the beetle is pretty good, there are a few rust spots but I was able to knock most of it off with a wire brush. Unfortunately, this picture was taken before I brushed some of the rust off so you can see some of the spots if you look hard enough.
 This is a small problem for me... I guess I am going to have to learn how to weld now!?!
 When I was removing the fenders I found that a couple of the nuts have been torn out of the body. I am going to have to find the hardware and get this fixed before I bolt on the new fenders. This is a picture of the rear driver's side... each of the fenders wells has at least one nut that has been pulled from the body.
Now lets move onto some of the bad things that I have found.
 The roof has a pretty good dent in it. It looks as if a tree limb had fallen on the car. This might also explain why the windshield was busted on this side? Dents don't really bother me since they are pretty easy to fill but, this particular dent has folded the roof line. I am going to have to do a little bit of research before I can fix this one.
The floor pans are in pretty bad shape. There are a couple of spots that have rusted through but I was not able to get a usable picture. There are a couple of major sized holes (about the same footprint as one of the seats) in the floor pans that have been "fixed" by the previous owner. It appears that they have placed a piece of steel over the hole and tacked it into place. This is on both the drivers and the passenger sides.
I was not planning on taking the body off of the frame but it looks as if this is the course that I am going to take. I have been told all my life, that if you are going to do something do it right... no difference here. So, again, I am going to have to learn how to weld.

Back to that welding thing...
This is an odd shot; I am looking down into the hood. This is where the spare tire would sit.
There is some tin, or very thin aluminum tacked into place. This whole piece is going to have to come out and be replaced. There are too many rust spots, a lot of ugliness and, it will not due as is.
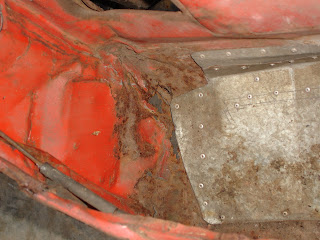 Here is another shot zoomed in.... yeah, that is my garage floor you are looking at. Below is one more shot from the other side.
  I believe this is called the front apron? I have seen this in a few catalogs so I don't think I am going to have a hard time finding the replacement.
 So, the next weekend should give me some time to get the rest of the paint off. I am hoping that I can get a couple of sections primered with a first coat.... I know this is going to have to be wet sanded and another coat of primer is going to have to go on but, I live in the south and I don't want the humidity to start rusting the exposed areas that are so fresh and so clean.
Maybe I will get around to gutting the interior some more (maybe)?
One last comment for this post.... I work with someone that has experience restoring an old car, he gave some advice that I thought I would share with everyone:
"Don't get frustrated if you don't meet your own dead lines. Life happens and time is stolen. It's not "fun" if you try to hold yourself to schedule….. Just enjoy the time you get to work on it and make steady progress."
3 comments:
Wow Pete - that paint stripper did the trick! I've got to see this puppy in person sometime soon.
REDog
Great progress! I've always loved the look of a "Naked Beetle" :)
And no worries on that front apron / spare tire well. If you cant get the welds right, you could always make it "removable" by using brackets and some bolts...
"Those who can, do. Those who can't, improvise." :)
THE YANKEES SUCK
Post a Comment